30% off Use code PINBOOSTR30 for 30% off your first payment Ends in --:--:-- Claim offer
Beginner-friendly guide

Learn PinBoostr in 6 simple steps

No experience needed. Follow this guide from top to bottom and you’ll go from a brand-new account to pins publishing on autopilot — with a clear screenshot for every step.

13 short lessons Screenshots included About 1 hour total

Your learning path

Six parts, in order. Jump to any part — or just start at the top.

1

Get set up

Create your account and connect Pinterest, boards, and your website.

01 5 min All plans

Create your account & finish onboarding

A short, guided setup that connects Pinterest and your first website so the dashboard has real data to work with.

pinboostr.com/dashboard
Create your account & finish onboarding screenshot
  1. Register with your email and password, or continue with Google.
  2. Connect Pinterest in the official sign-in window.
  3. Add your first website by URL — PinBoostr reads the sitemap to find your posts.
  4. Follow the steps until each one shows a green check.
  5. Click “Continue to AI Designer”, or open the dashboard.
Good to know
  • If the Pinterest window closes early, sign in to the right Pinterest account in the same browser, then retry.
  • You can skip optional steps and finish them later.
02 4 min All plans

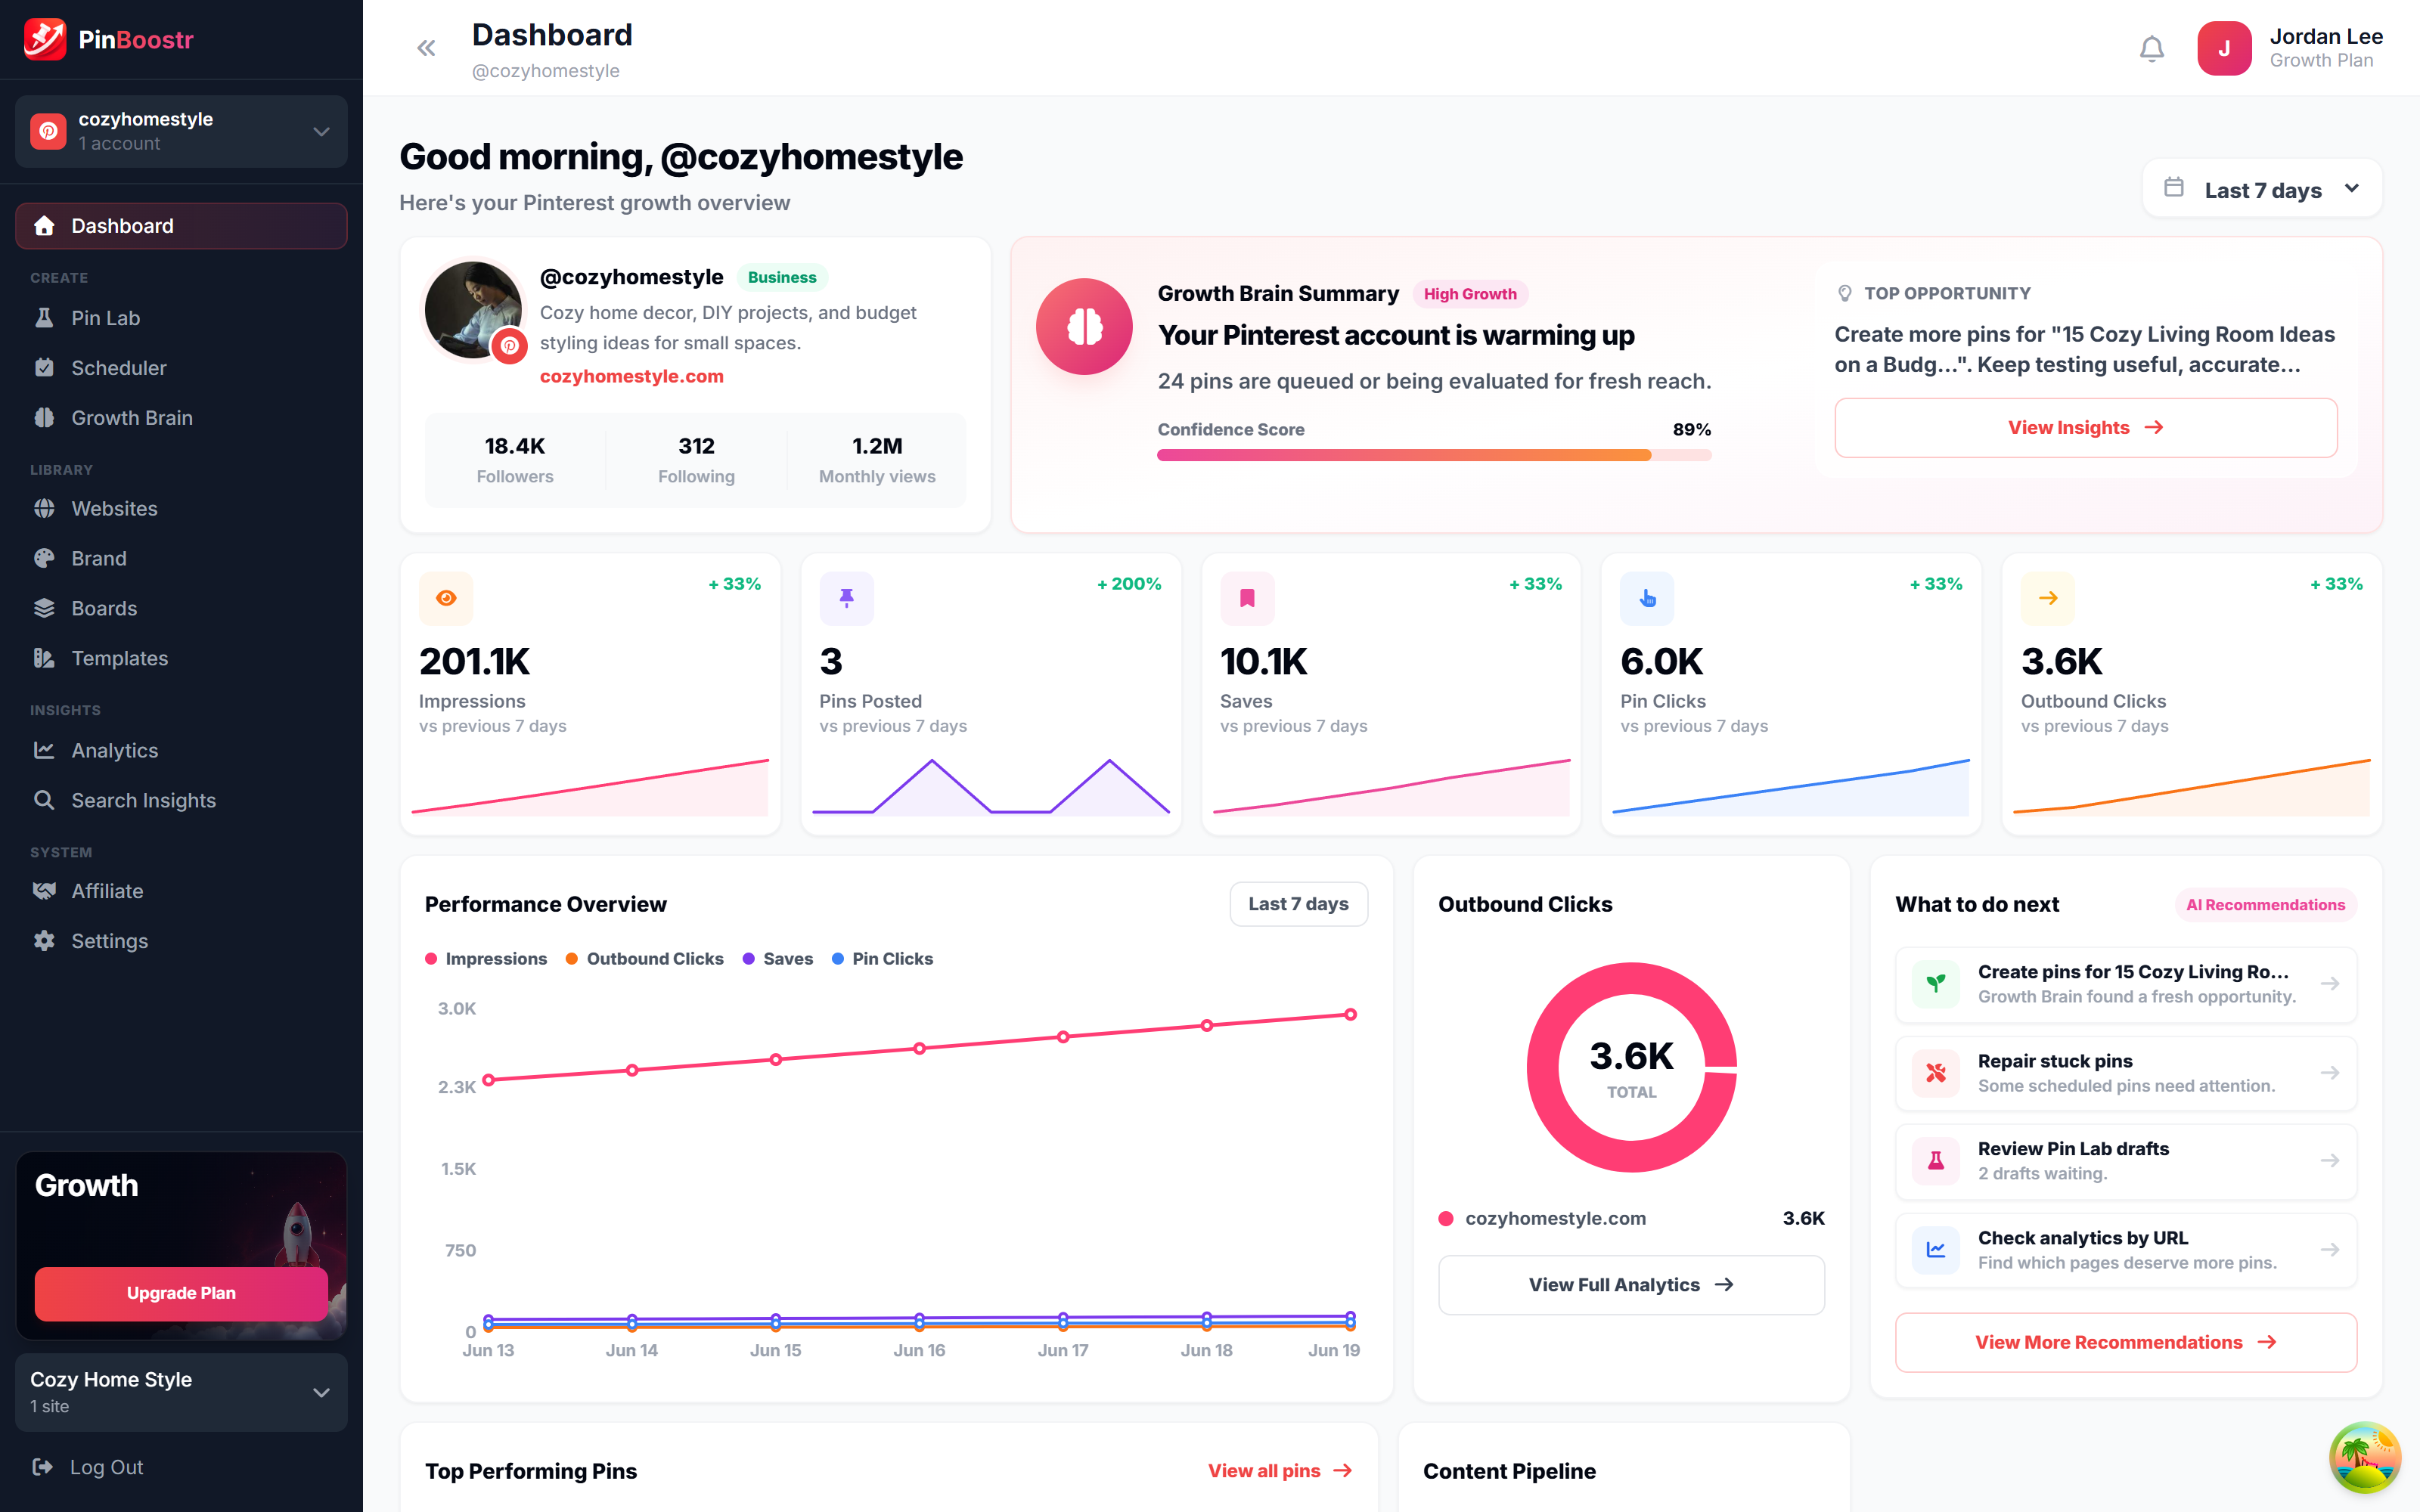
Read your dashboard

Your daily home base — profile stats, recent performance, Growth Brain status, top pins, and what to do next.

pinboostr.com/dashboard
Read your dashboard screenshot
  1. Check the profile card for followers and monthly views.
  2. Read the Growth Brain Summary for your top opportunity.
  3. Scan the metric tiles — impressions, saves, and clicks.
  4. Switch the date range (7 / 30 / 90 days) to compare.
  5. Follow “What to do next” to your most useful action.
Good to know
  • Switch Pinterest accounts from the selector at the top-left.
  • Every panel links straight to its full tool.
03 3 min All plans

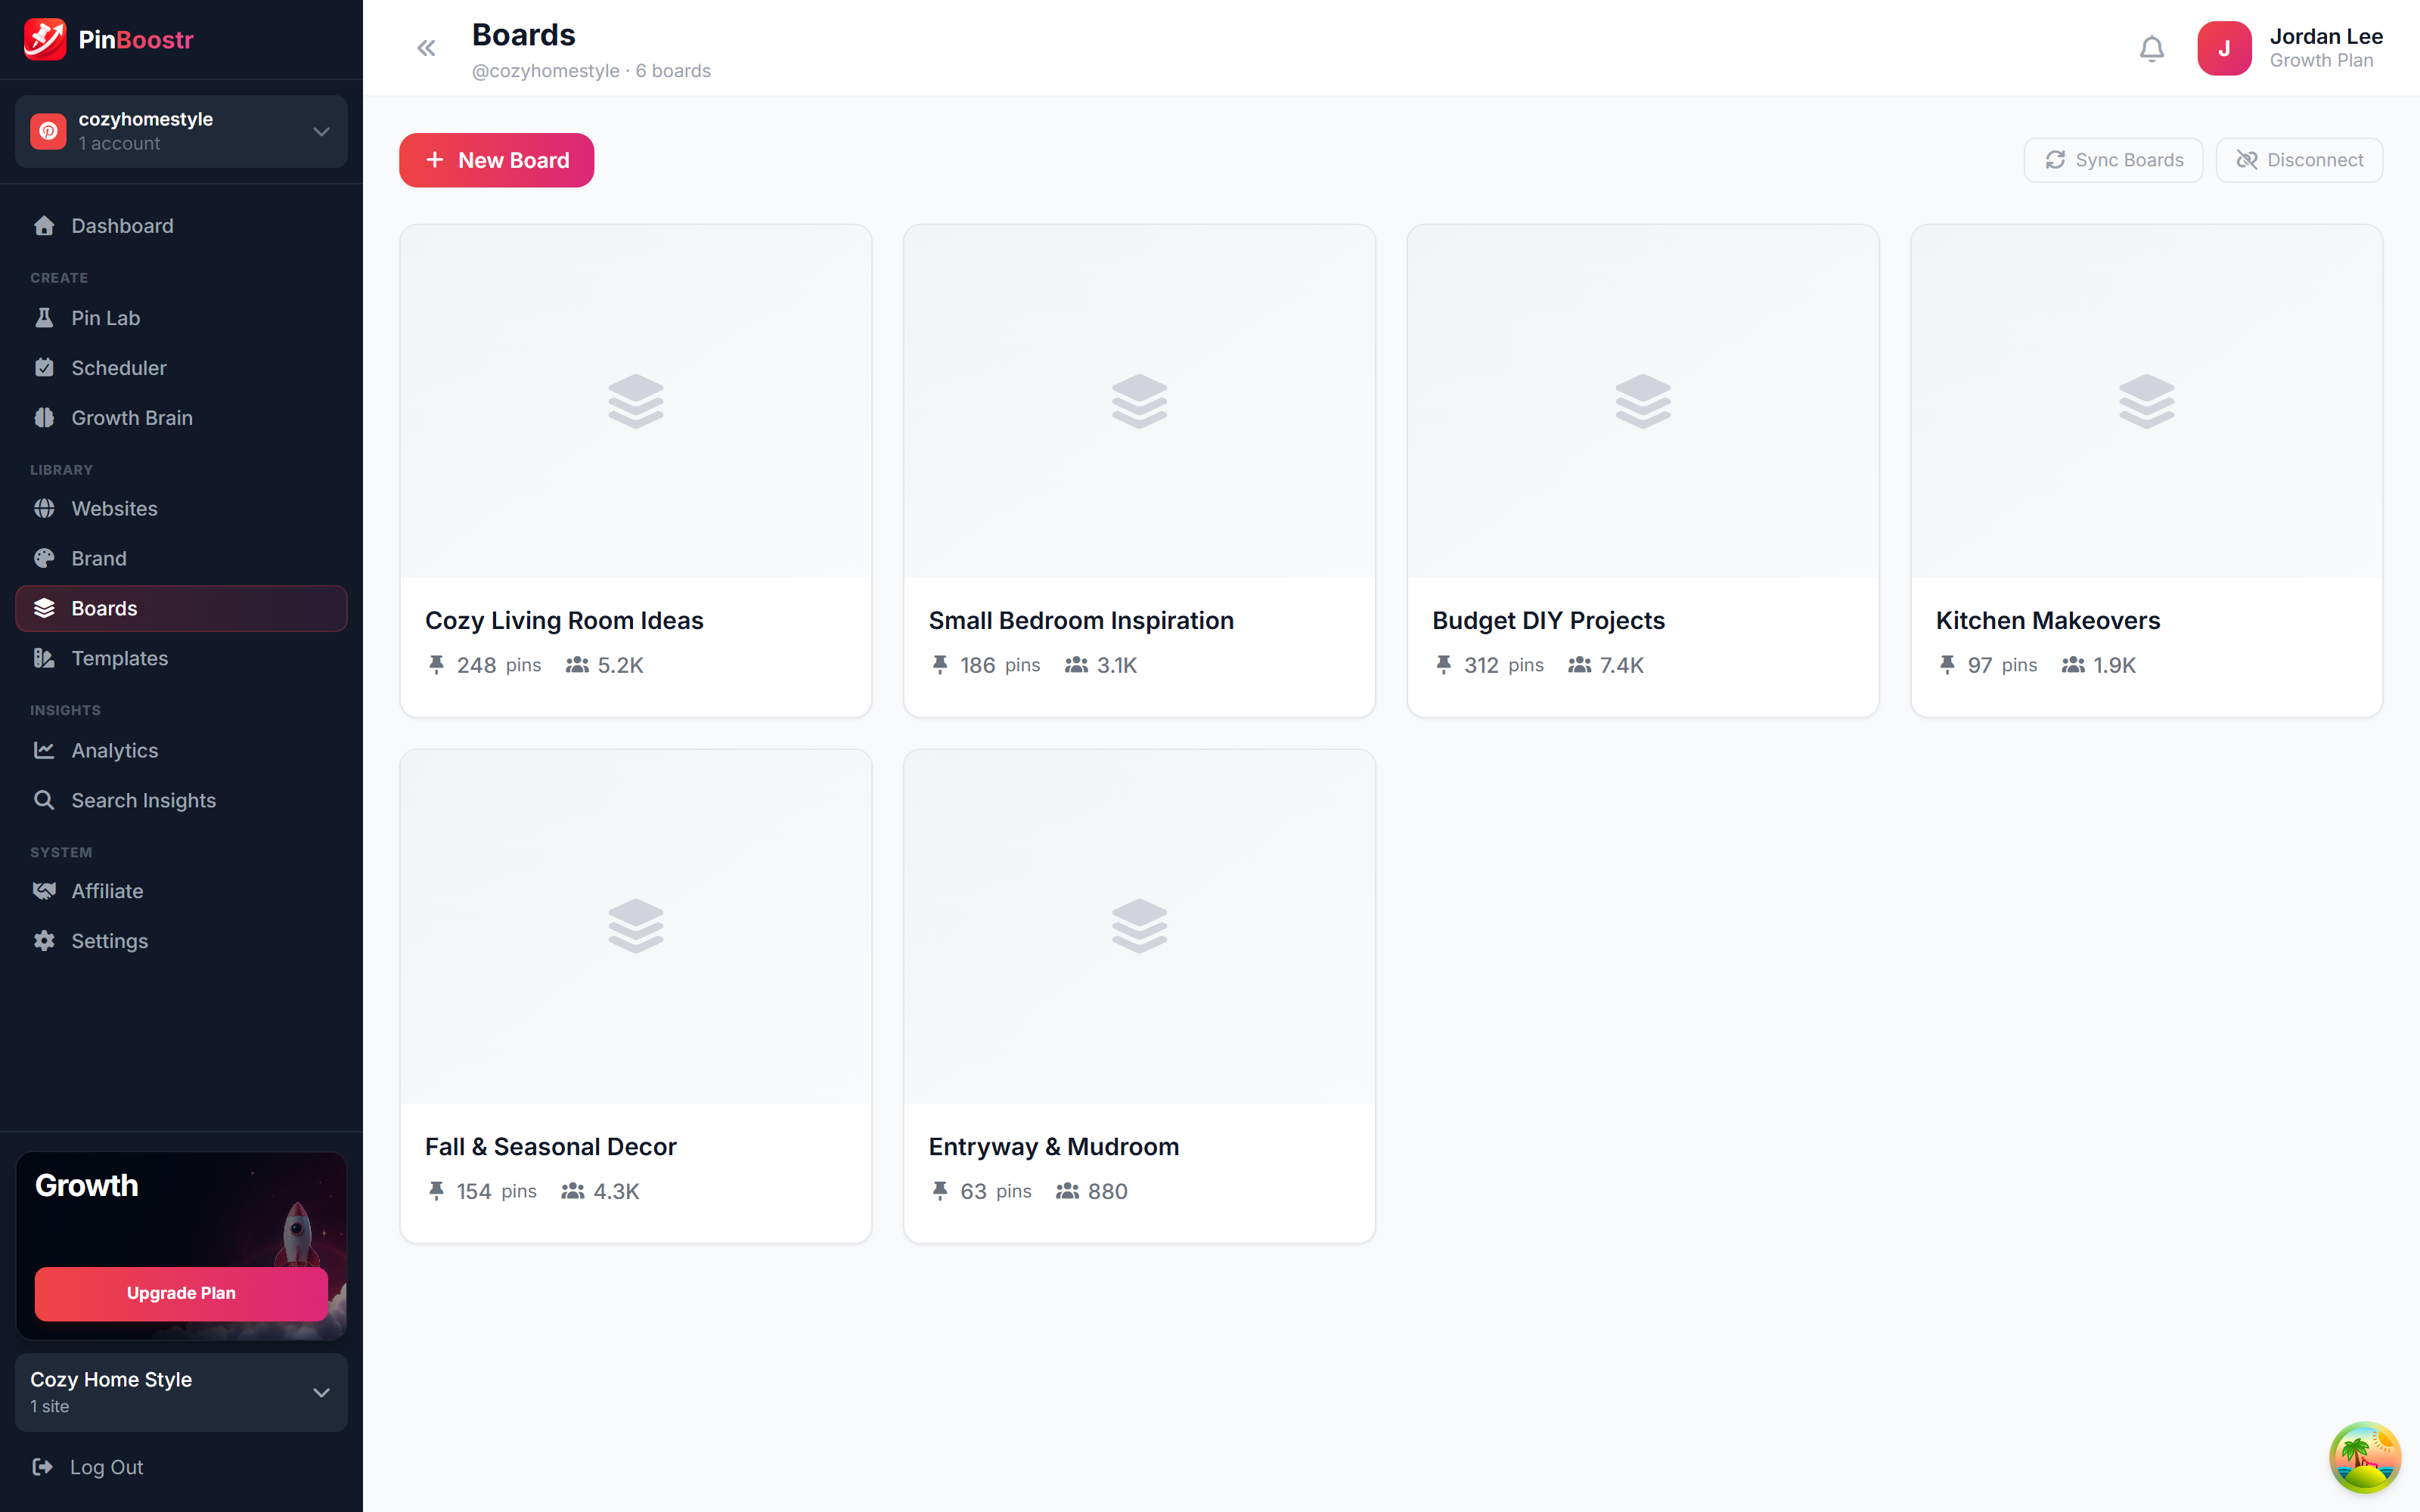
Sync your boards

Boards are where pins get published. PinBoostr uses them for automatic board matching and manual board choices.

pinboostr.com/dashboard
Sync your boards screenshot
  1. Open Boards to see every board on the connected account.
  2. Click “Sync Boards” after creating or renaming boards on Pinterest.
  3. Create a new board right from PinBoostr if you need one.
  4. Check pin counts to spot your strongest boards.
  5. Keep board names clear and keyword-aware.
Good to know
  • A board missing? Click Sync Boards and confirm the active account.
04 5 min All plans

Connect your website

A connected site turns any blog post or product page into a pin in one click — and feeds Growth Brain the links it promotes.

pinboostr.com/dashboard
Connect your website screenshot
  1. Open Websites, paste your site URL, and click “Add Website”.
  2. PinBoostr finds your sitemap and counts the usable links.
  3. On WordPress, install the WP connector for richer sync.
  4. Click “Refresh links” after publishing new posts.
  5. Open a site to organise links into categories.
Good to know
  • No links found? Confirm the sitemap URL and that posts are public.
  • Free and Starter plans include fewer websites — upgrade to add more.
2

Brand & designs

Teach PinBoostr your look and build reusable pin templates.

05 8 min All plans

Set your brand & AI style

Stores the colors, fonts, tone, and image rules used by Pin Lab and Growth Brain so AI designs always look like you.

pinboostr.com/dashboard
Set your brand & AI style screenshot
  1. Open Brand and run the site study to learn your niche.
  2. Confirm your brand name, topic, and audience.
  3. Set your colour palette — primary, secondary, background, text.
  4. Tune the AI image text rules (labels, badges, slogans).
  5. Generate the 5-style preview set for a consistent look.
Good to know
  • A saved site study improves copy, design, and growth tips everywhere.
  • Generating styles uses credits — only refresh when you mean to change them.
06 10 min All plans

Build your template library

Reusable pin layouts. Save a few strong designs once and reuse them across every batch for a consistent feed.

pinboostr.com/dashboard
Build your template library screenshot
  1. Open Templates to browse saved designs and your AI style kit.
  2. Click “New Template” to open the visual editor.
  3. Add text, shapes, images, and image slots on the canvas.
  4. Use the layers and properties panels to fine-tune.
  5. Save the template so it appears inside Pin Lab.
Good to know
  • Every required image slot must be filled before a pin is ready.
  • Short on time? Duplicate an AI style and tweak it.
3

Create & publish

Build reviewed pins, then manage them from the Scheduler.

07 12 min Starter +

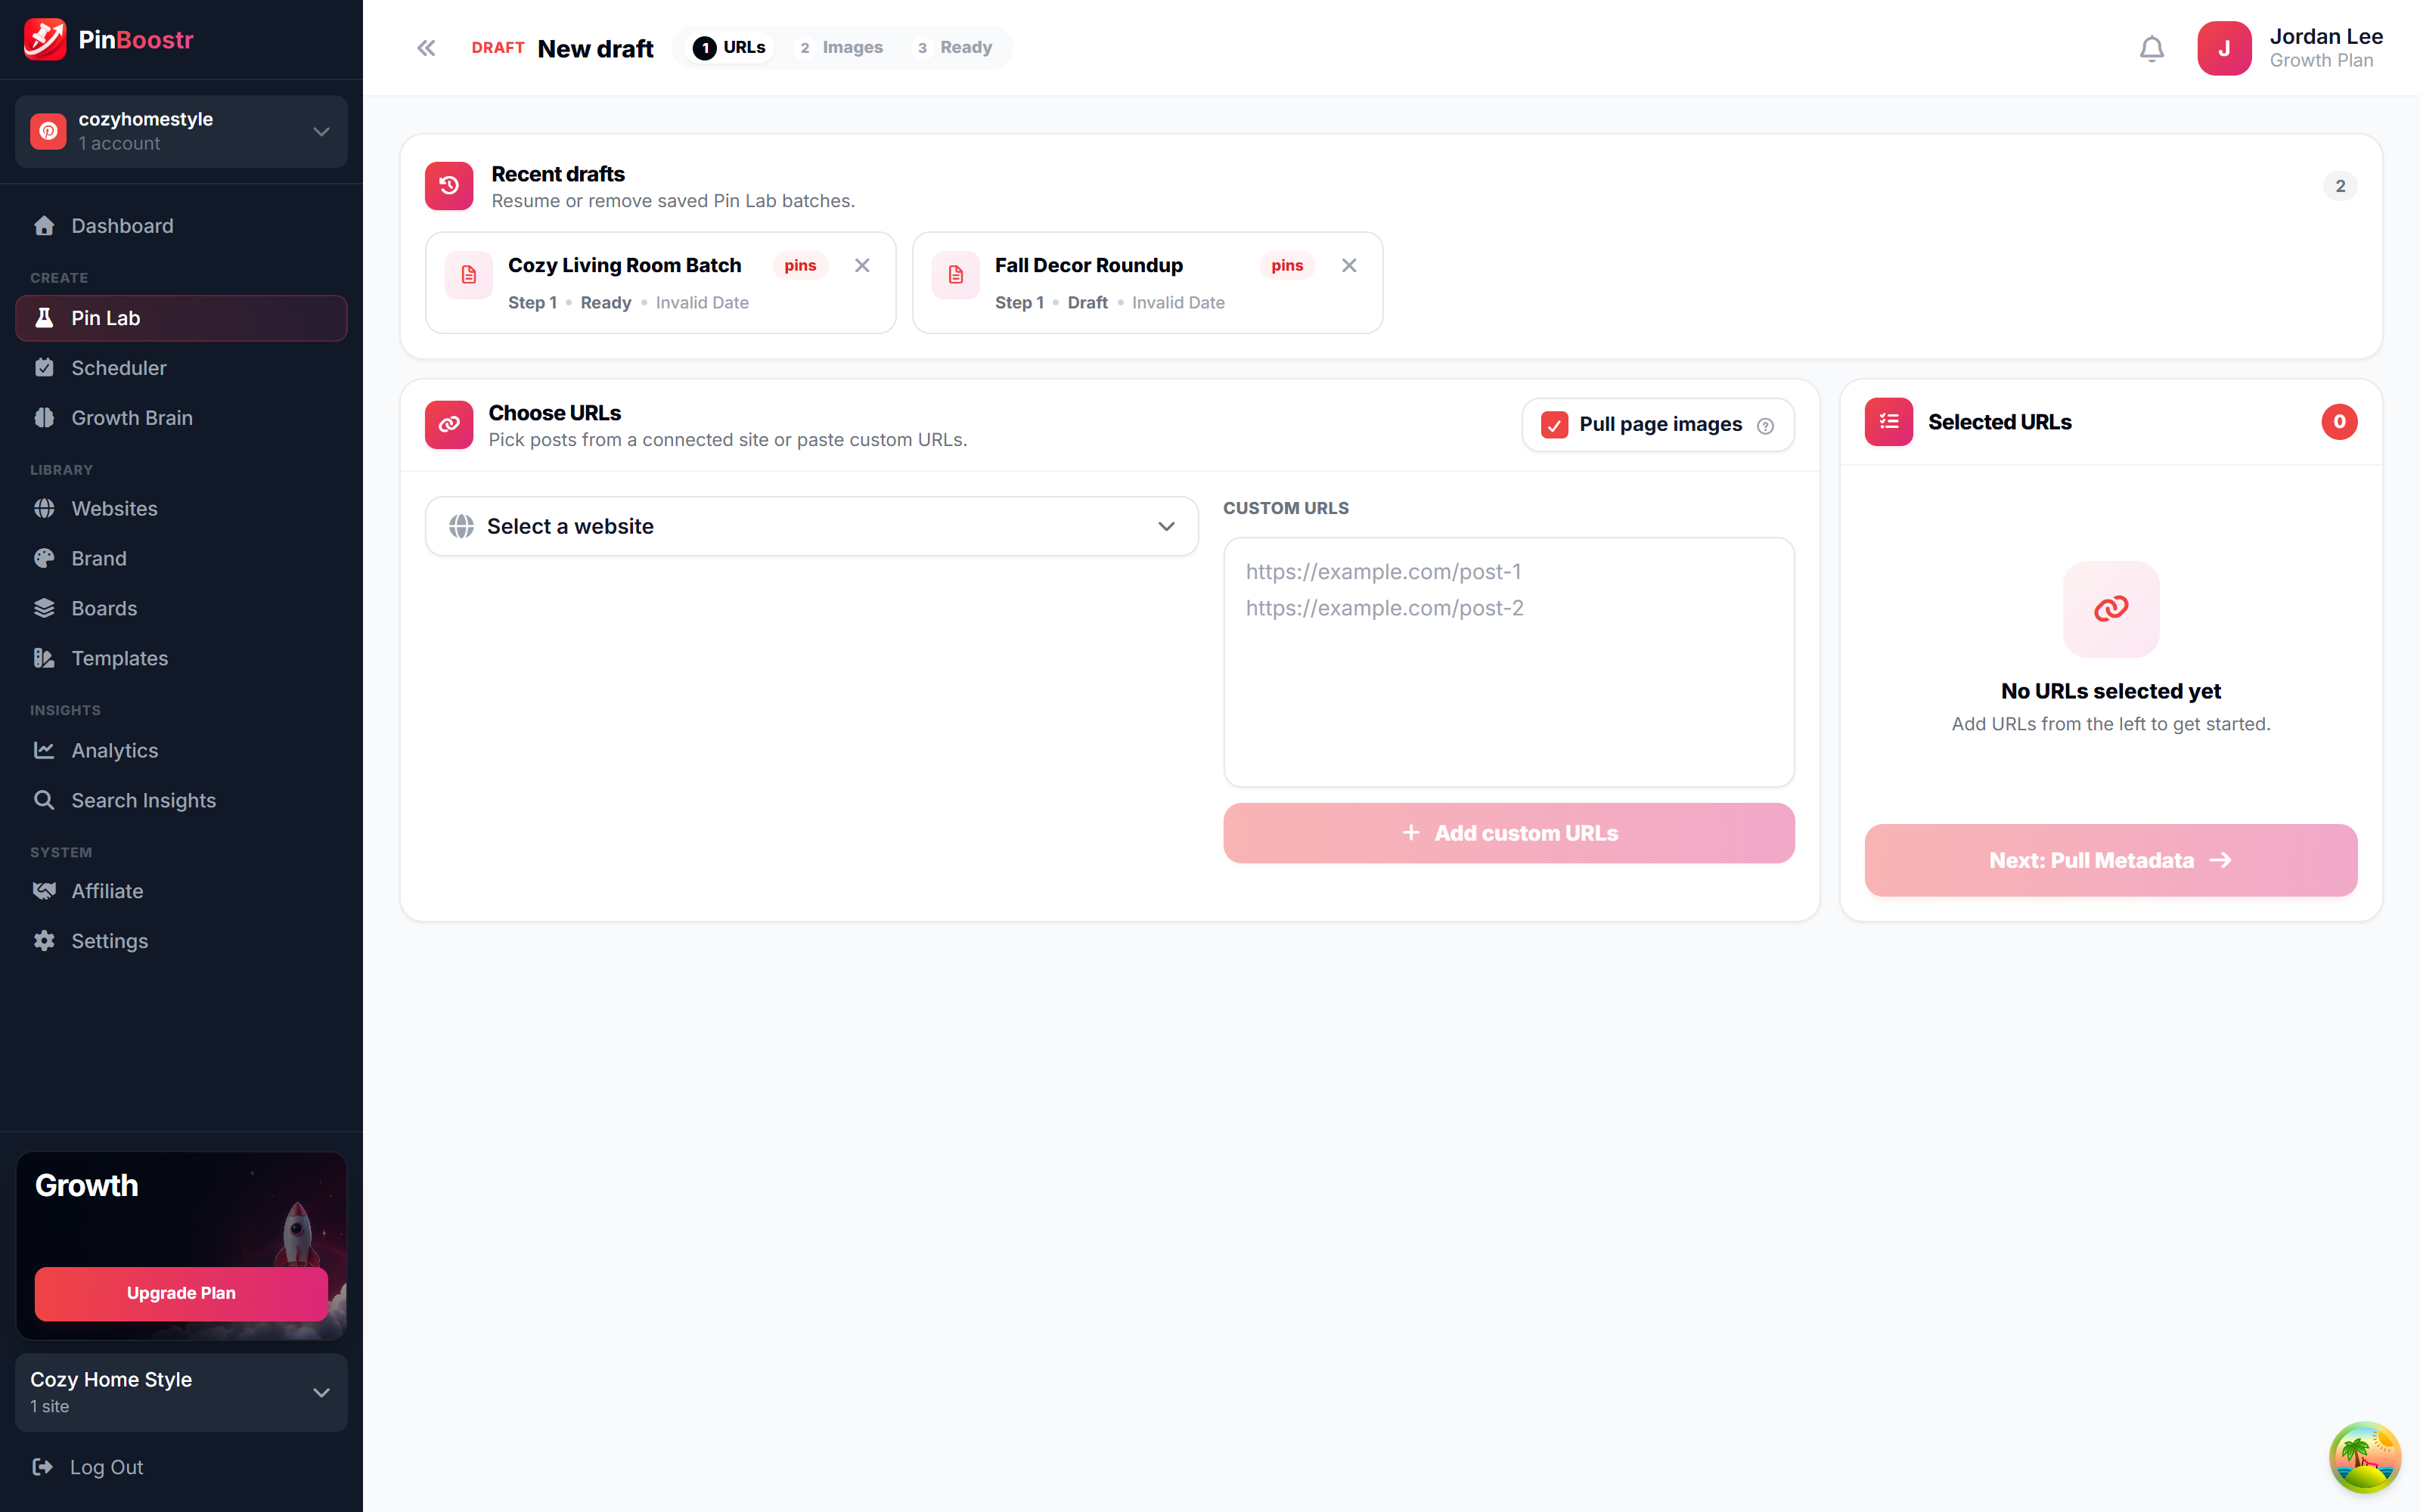
Create reviewed pins in Pin Lab

The controlled creation flow. Inspect every title, image, board, template, and schedule before anything publishes.

pinboostr.com/dashboard
Create reviewed pins in Pin Lab screenshot
  1. Open Pin Lab, choose a website or paste URLs, and add them.
  2. Click “Pull metadata” to fill each row with title and images.
  3. Generate AI copy — title, description, alt text, and board ideas.
  4. Open each row and fix every “Required” item.
  5. Pick a template or AI image, then schedule and approve.
Good to know
  • A “Required” warning? Open the row and fix the listed fields.
  • Weak AI copy? Select the right website and board, then regenerate.
08 7 min All plans

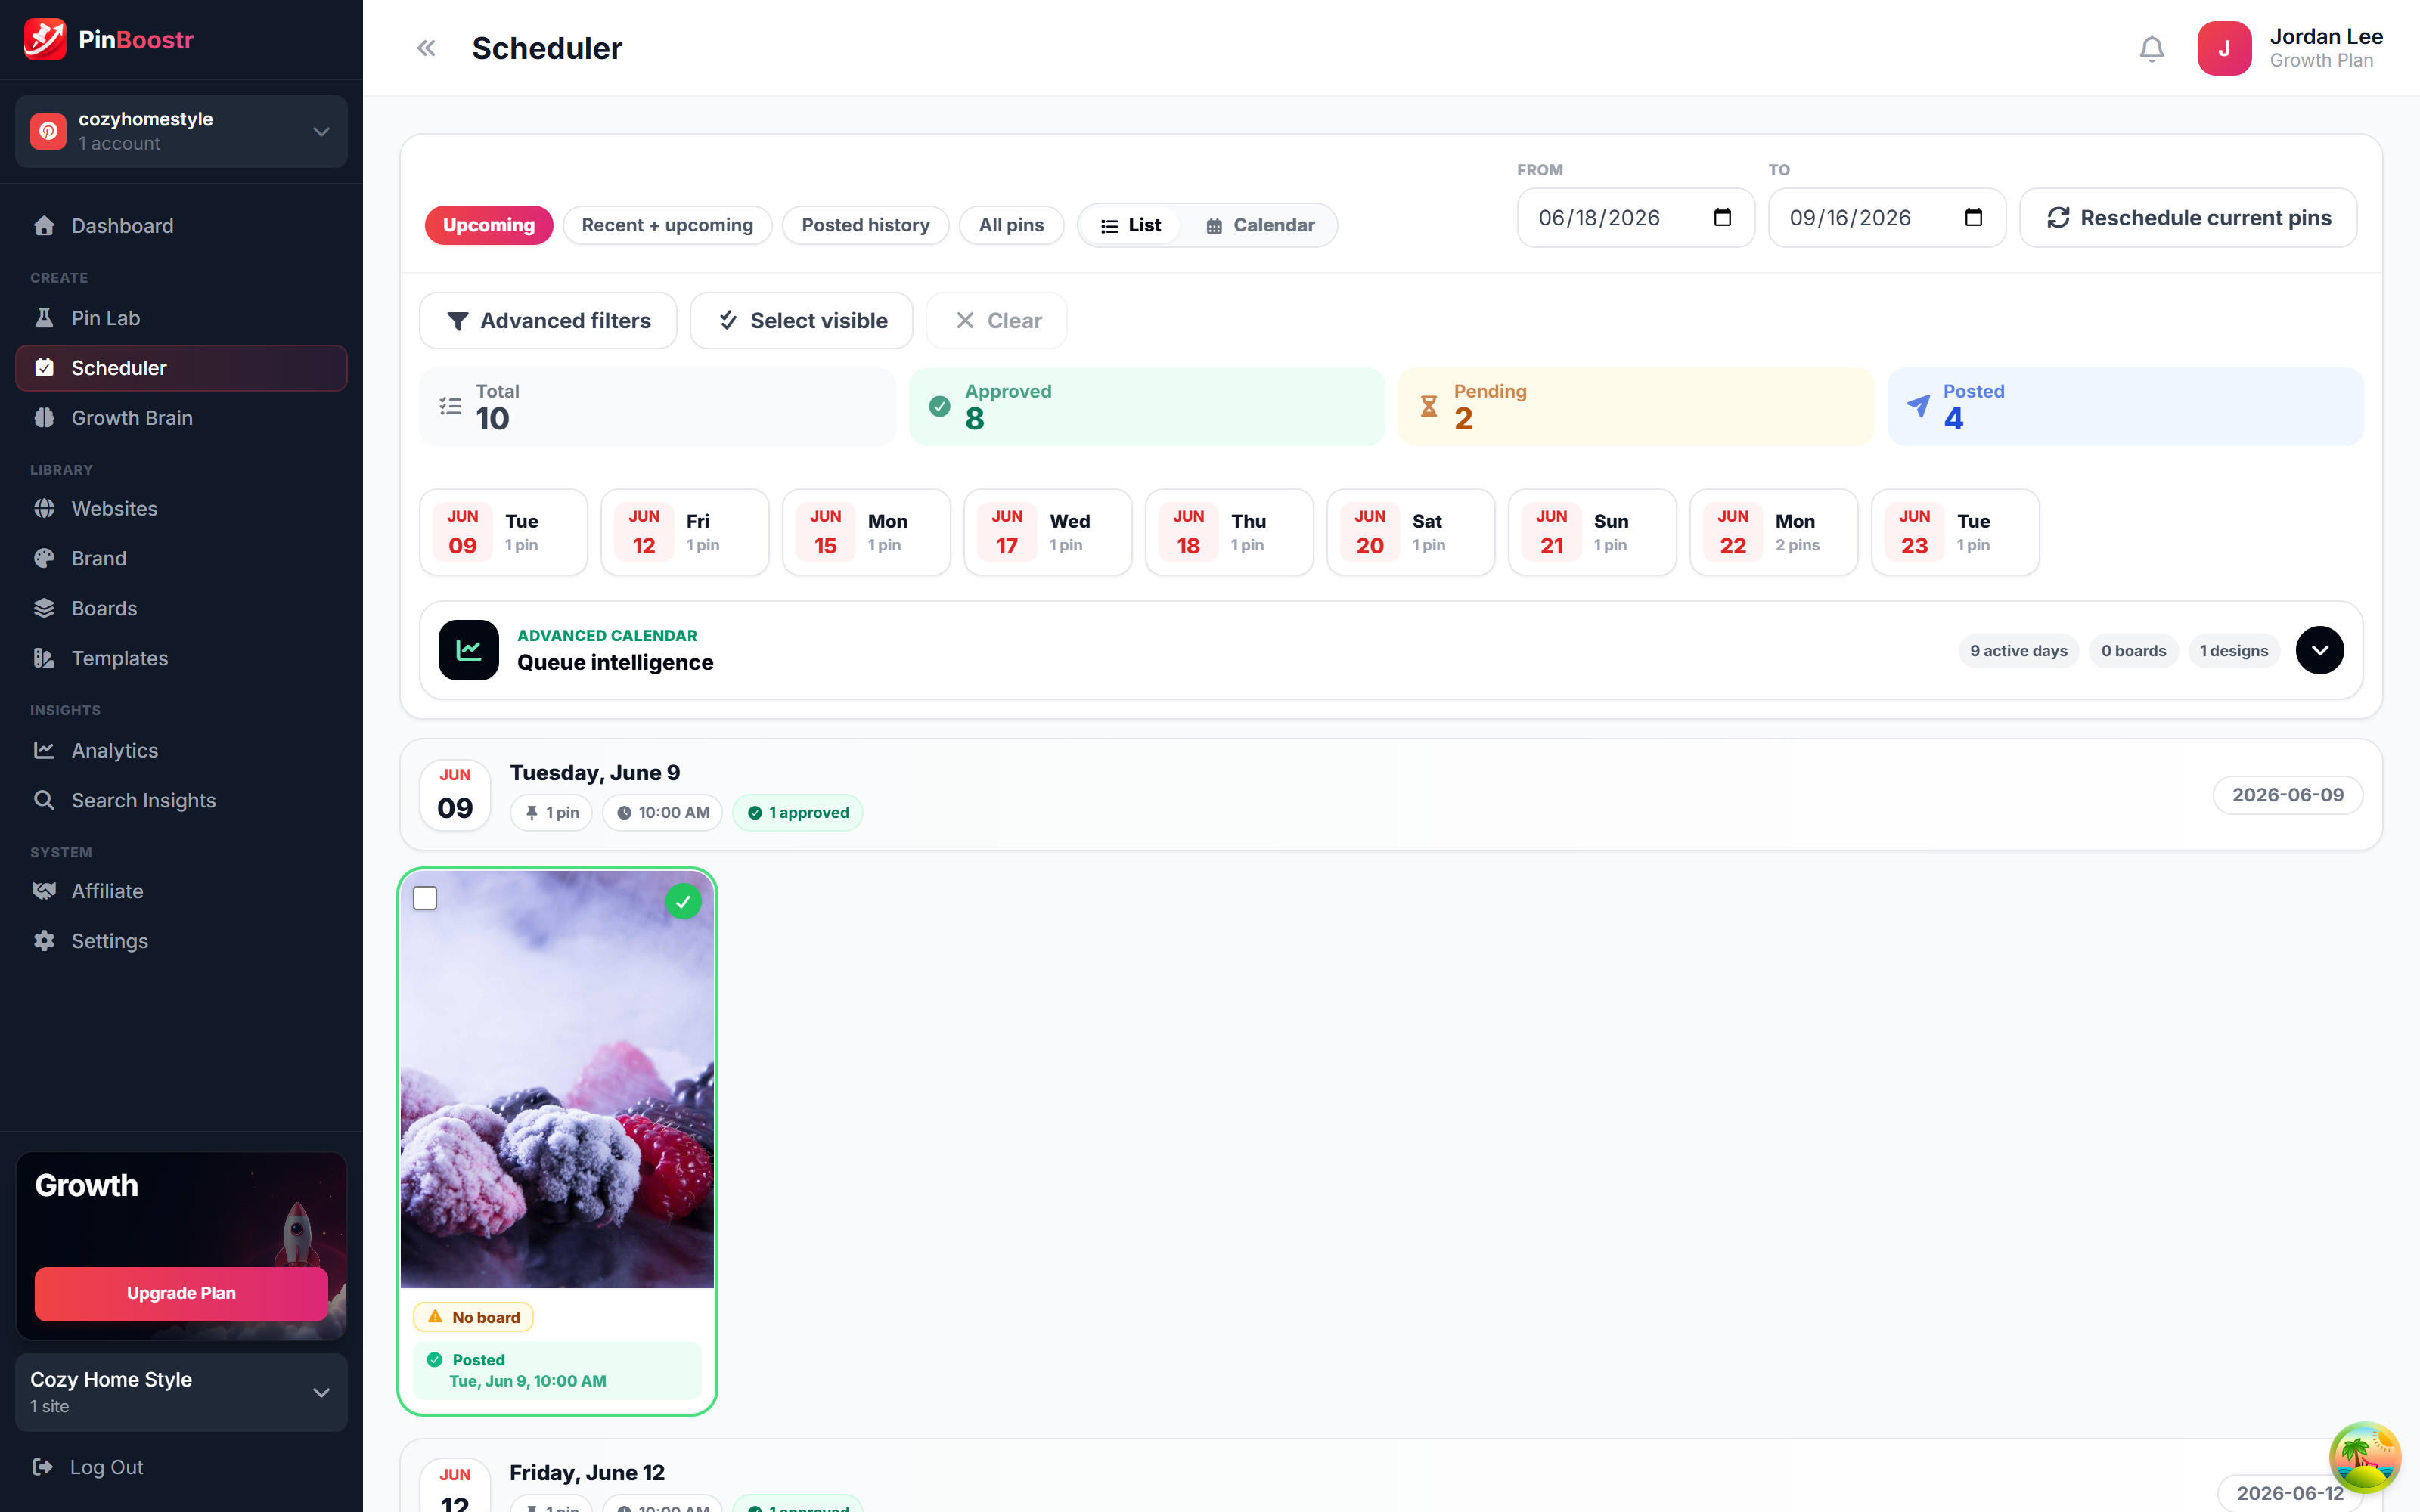
Manage the publishing queue

The source of truth for approved pins, before and after they publish — where timing, boards, and status stay clean.

pinboostr.com/dashboard
Manage the publishing queue screenshot
  1. Open Scheduler to see upcoming, posted, pending, and failed pins.
  2. Switch between List and Calendar views to inspect pacing.
  3. Use the filter tabs to focus the queue.
  4. Open any pin to edit its title, board, image, or time.
  5. Read failed-pin errors, fix the cause, then retry.
Good to know
  • A pin failed? Open it and read the error before changing anything.
  • Re-render a pin after design edits so its preview stays current.
4

Grow on autopilot

Let Growth Brain plan a steady pin queue for you.

09 12 min Growth +

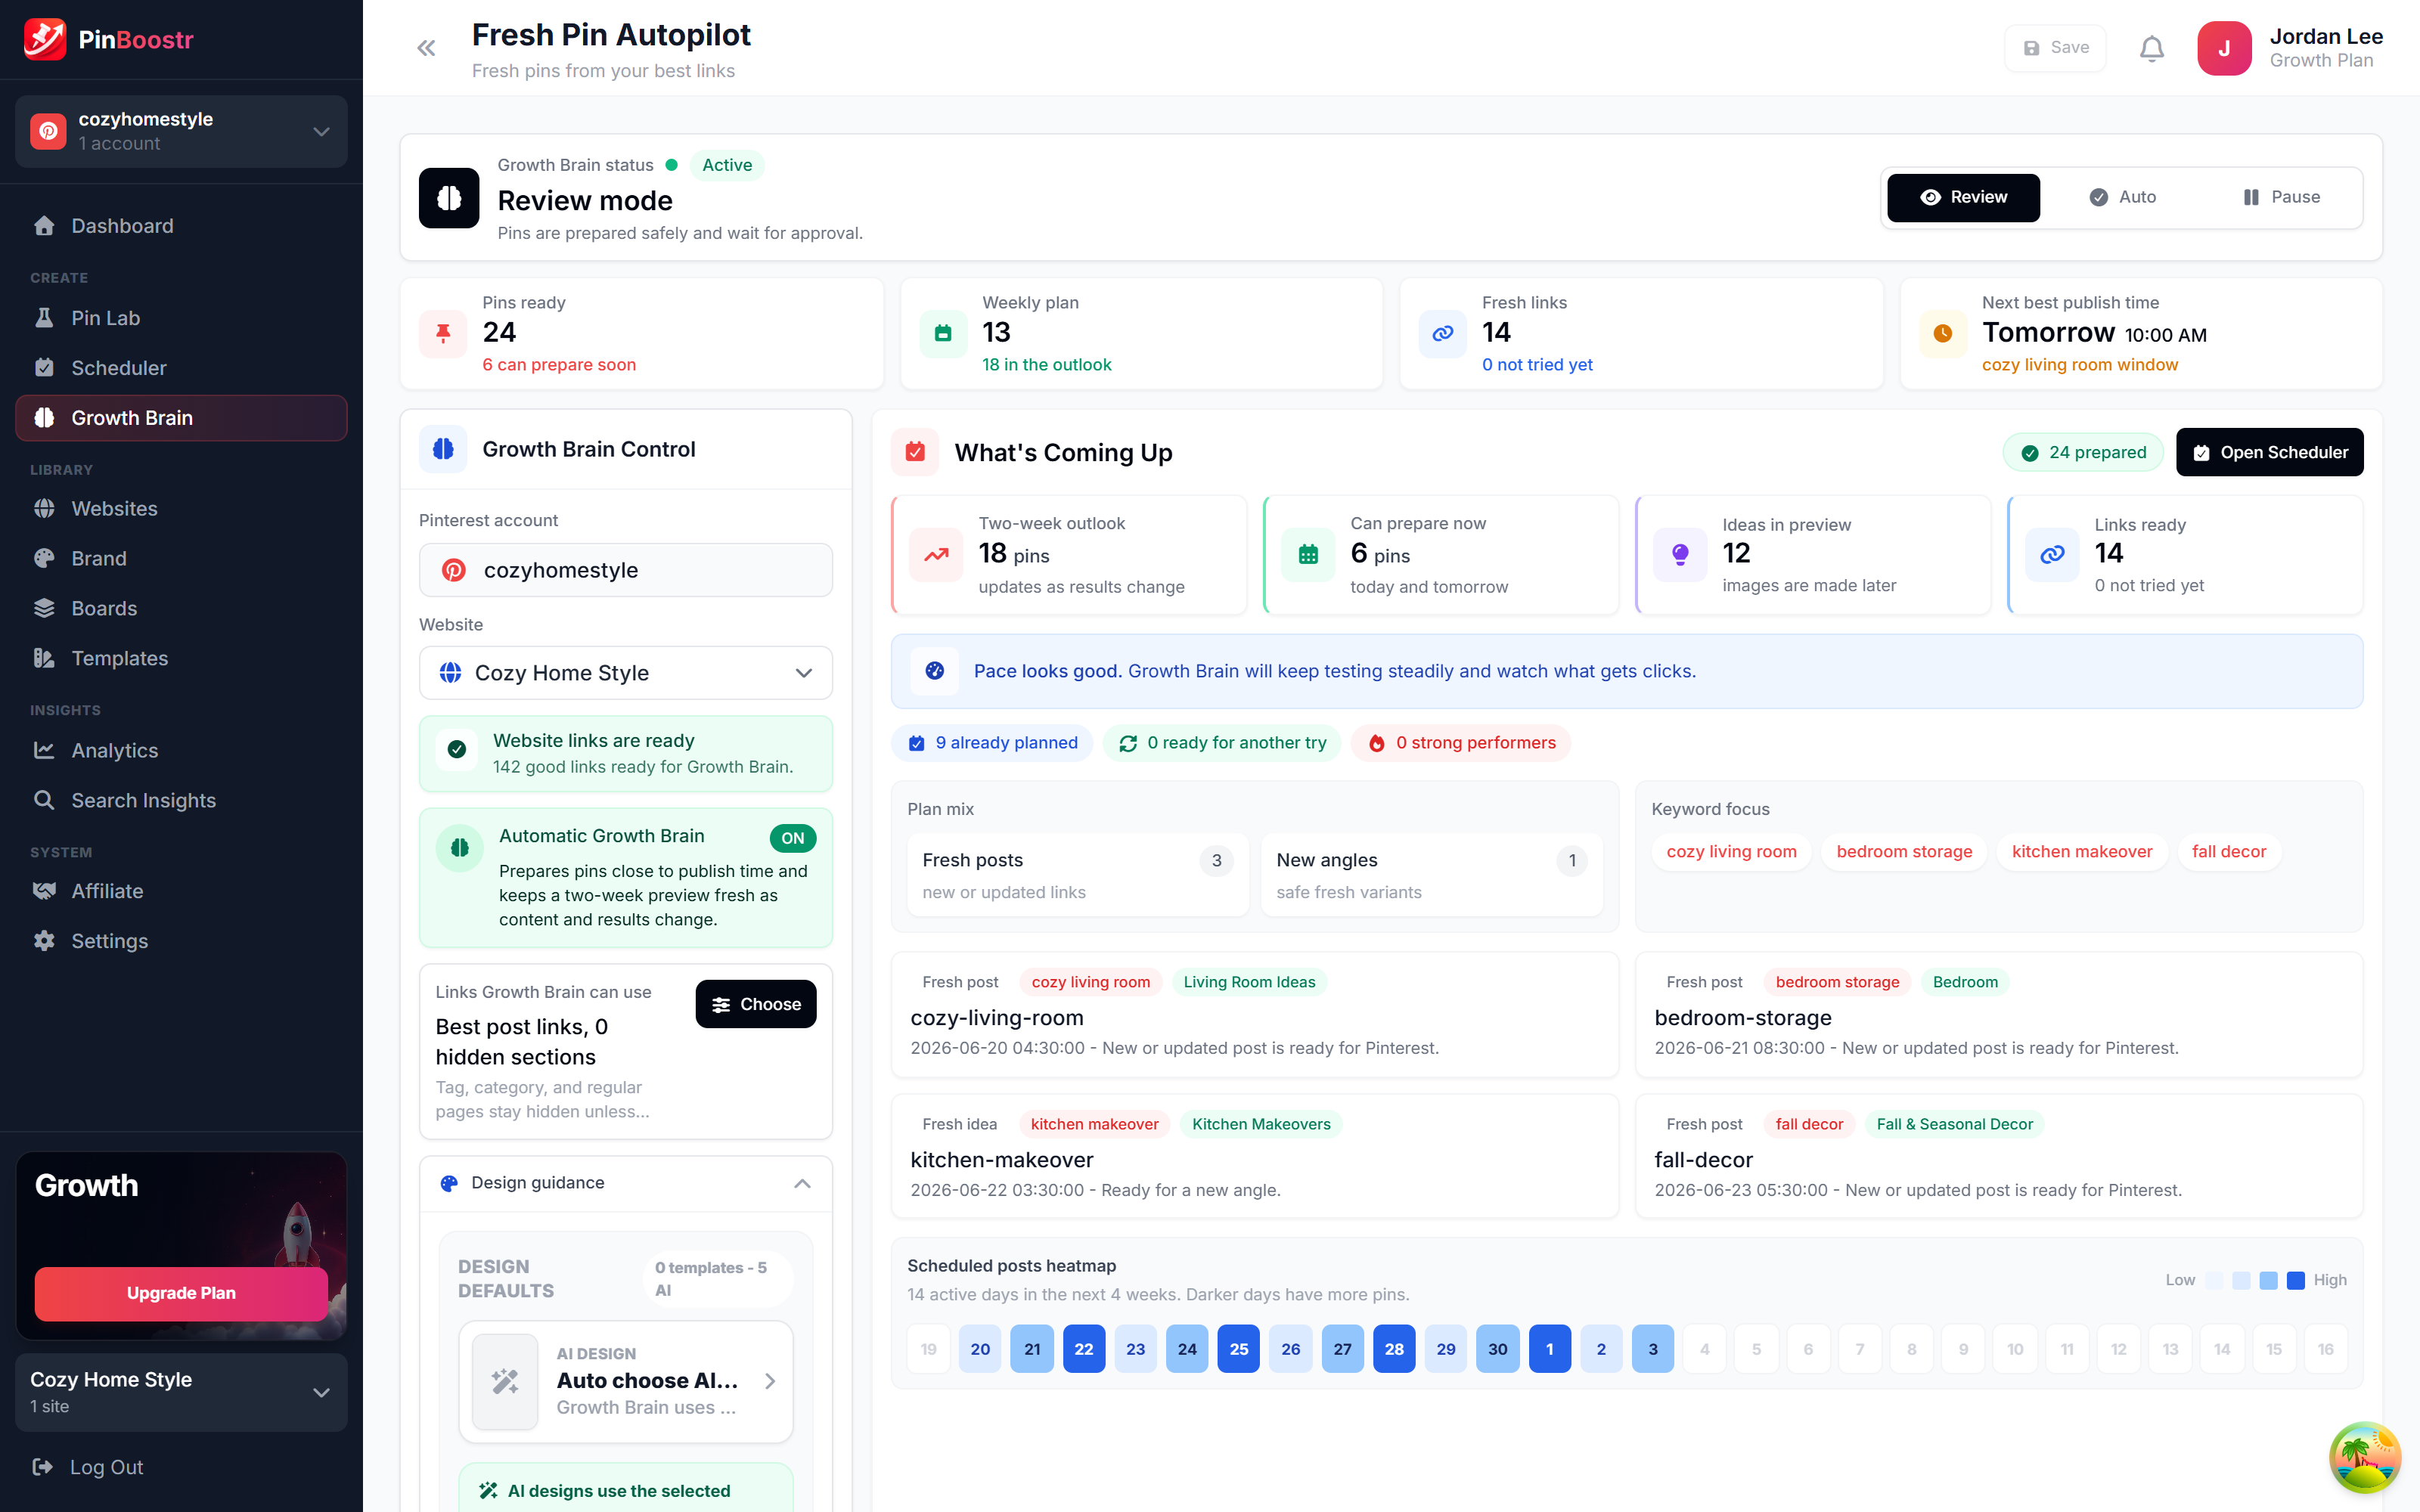
Plan pins automatically with Growth Brain

Turns your links, keywords, board matching, and performance history into a steady, review-ready publishing plan.

pinboostr.com/dashboard
Plan pins automatically with Growth Brain screenshot
  1. Pick the Pinterest account and website to work from.
  2. Choose which links it can use and set design guidance.
  3. Keep it in Review mode so every pin waits for approval.
  4. Read “What’s Coming Up” — outlook, prepared pins, keywords.
  5. Approve the prepared pins, then check back for winners.
Good to know
  • Seeing “Needs links”? Refresh your website links or choose more.
  • Use Growth Brain when consistency matters more than hand-building pins.
5

Research & measure

Find keywords and read analytics to decide what to make next.

10 8 min Starter +

Find keywords & trends

Search Insights helps your pin language match how people actually search on Pinterest, before you build a big batch.

pinboostr.com/dashboard
Find keywords & trends screenshot
  1. Open Search Insights and choose Keyword Research or Trend Radar.
  2. Pick a region and search your topic or seasonal idea.
  3. Filter by Growing, Monthly, Yearly, or Seasonal.
  4. Save keyword ideas that truthfully fit your content.
  5. Use the strongest keywords in titles, descriptions, and boards.
Good to know
  • Too broad? Add audience, season, product, or problem context.
  • Keyword research has a monthly allowance per plan.
11 8 min All plans

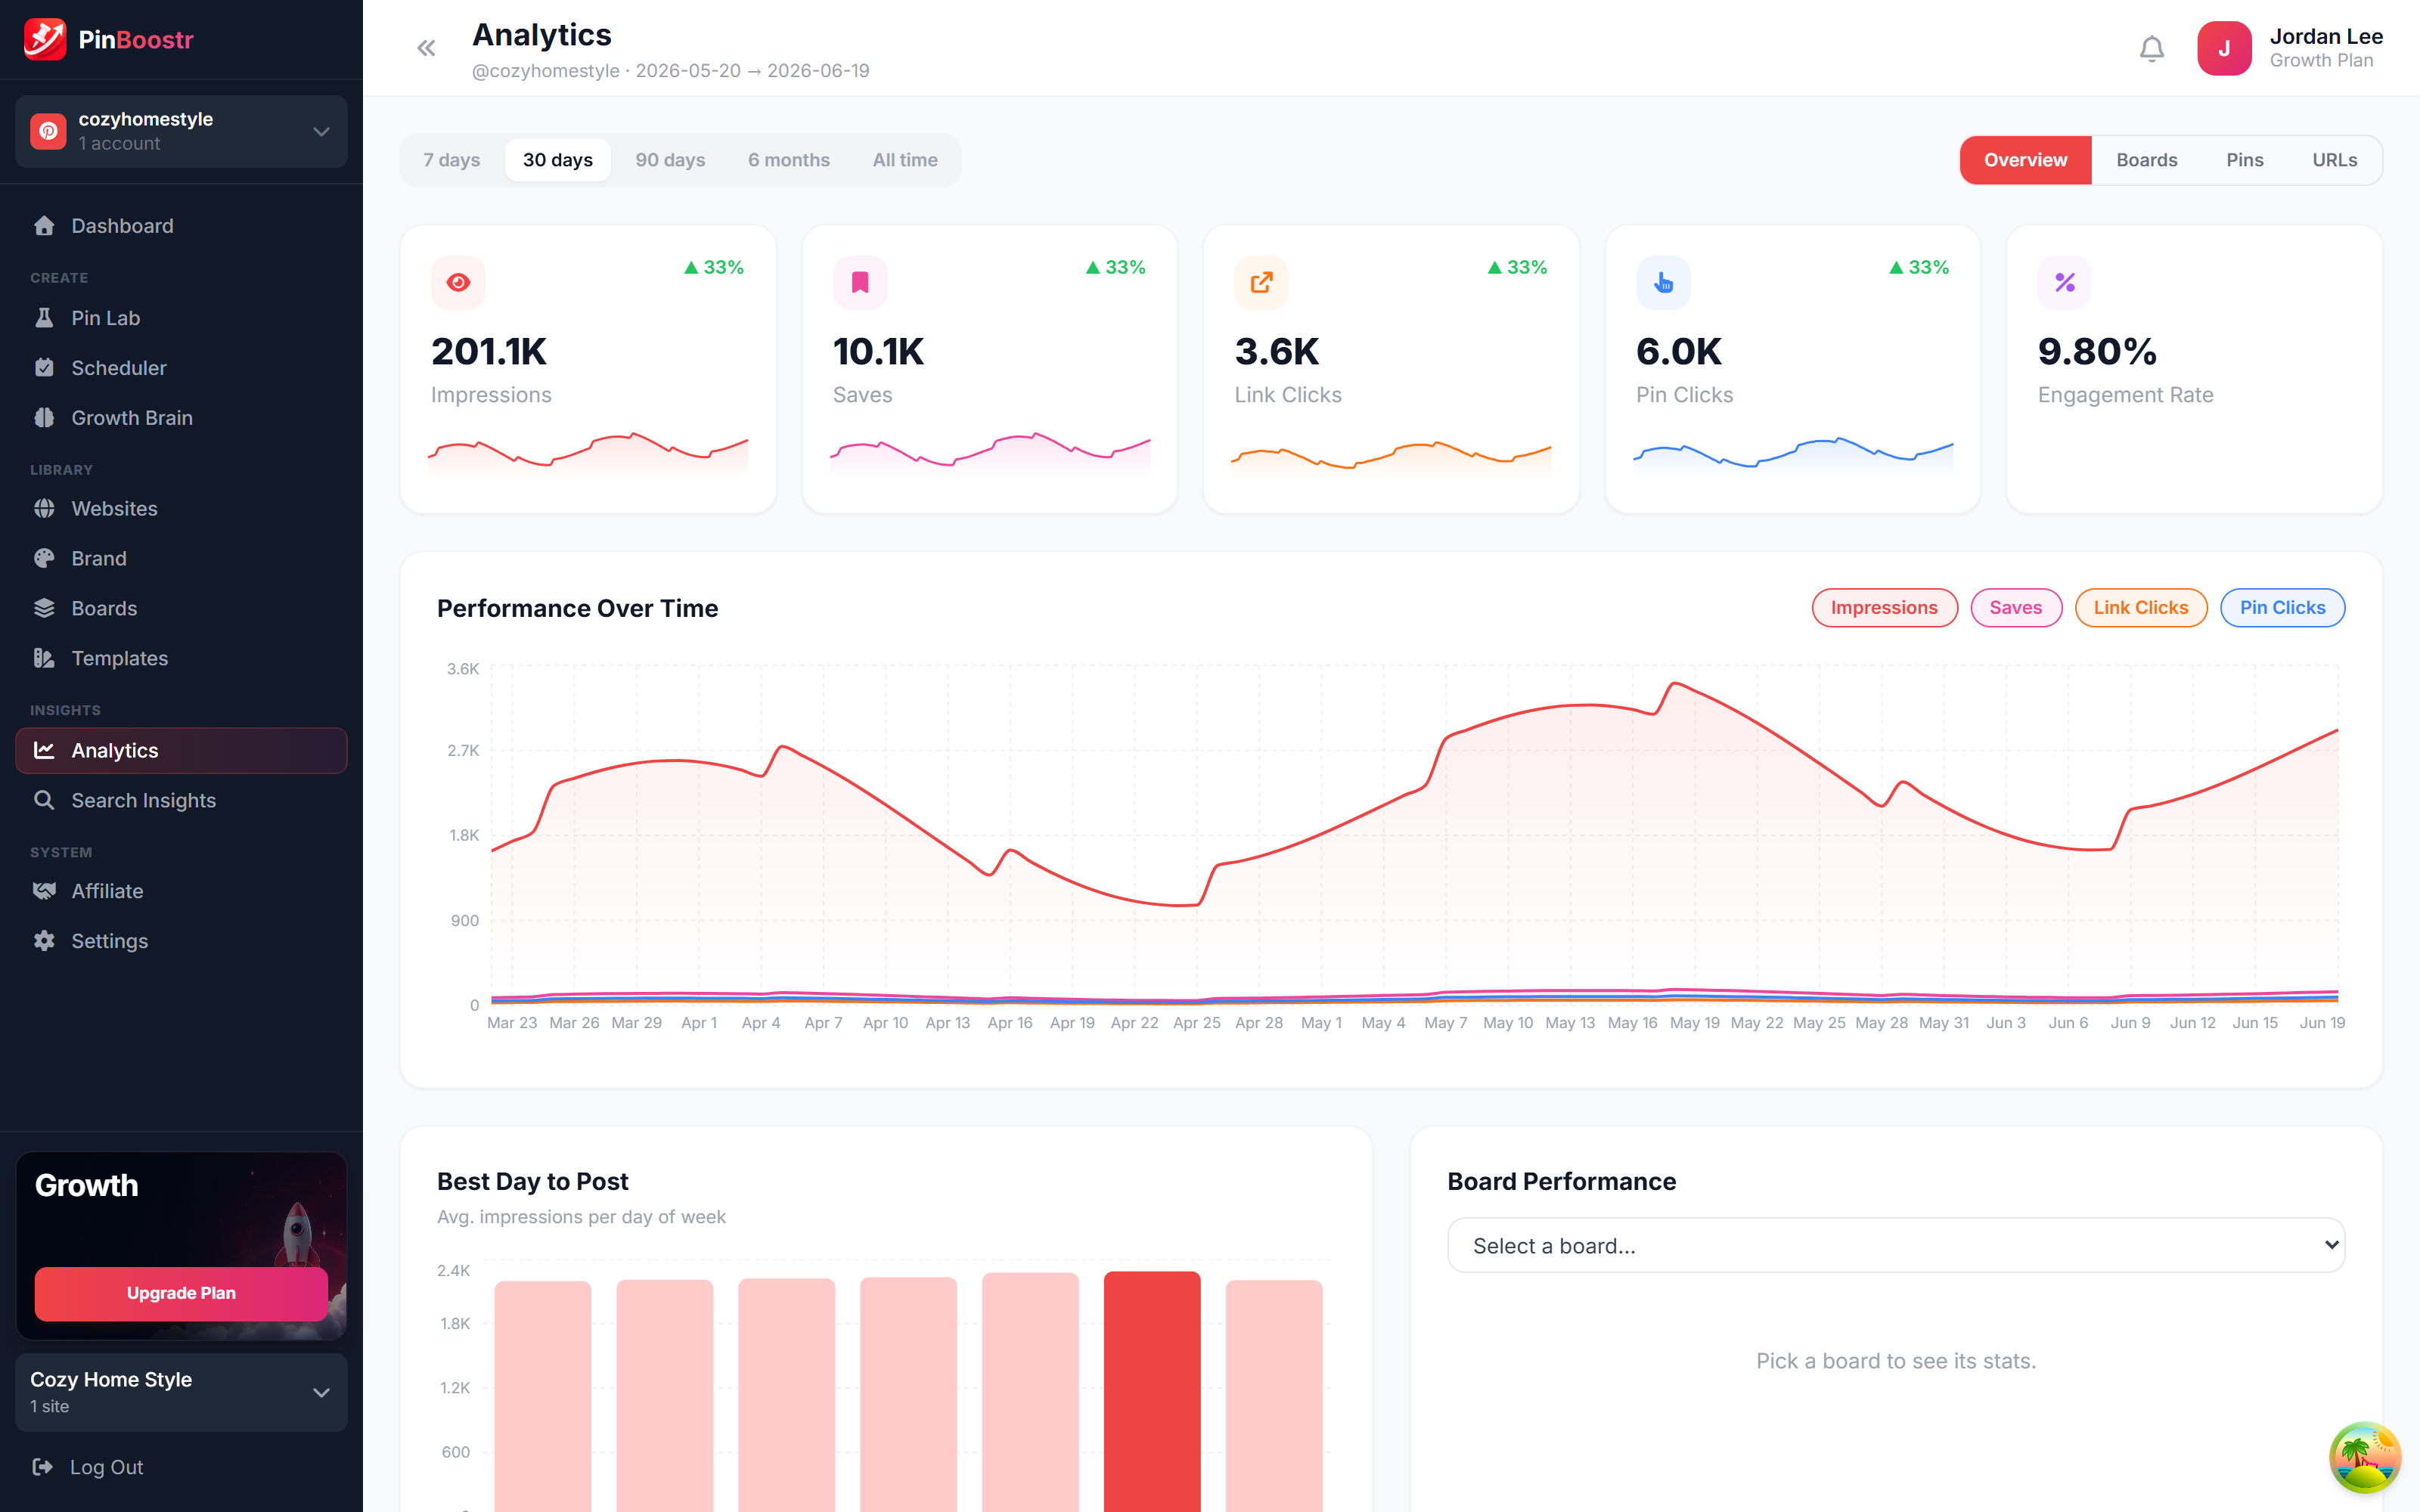
Use Analytics to plan the next batch

Turns Pinterest performance into decisions — find patterns across boards, days, keywords, and pins.

pinboostr.com/dashboard
Use Analytics to plan the next batch screenshot
  1. Open Analytics and choose a date range.
  2. Read impressions, saves, clicks, and engagement rate.
  3. Use “Best Day to Post” to time your queue.
  4. Open the Boards, Pins, and URLs tabs to find winners.
  5. Make more pins for winning topics, with fresh creative.
Good to know
  • No data yet? Confirm pins have posted and wait for Pinterest reporting.
  • High impressions but low clicks? Improve the hook and the destination.
6

Account & earn

Manage your plan and earn commission by referring others.

12 4 min All plans

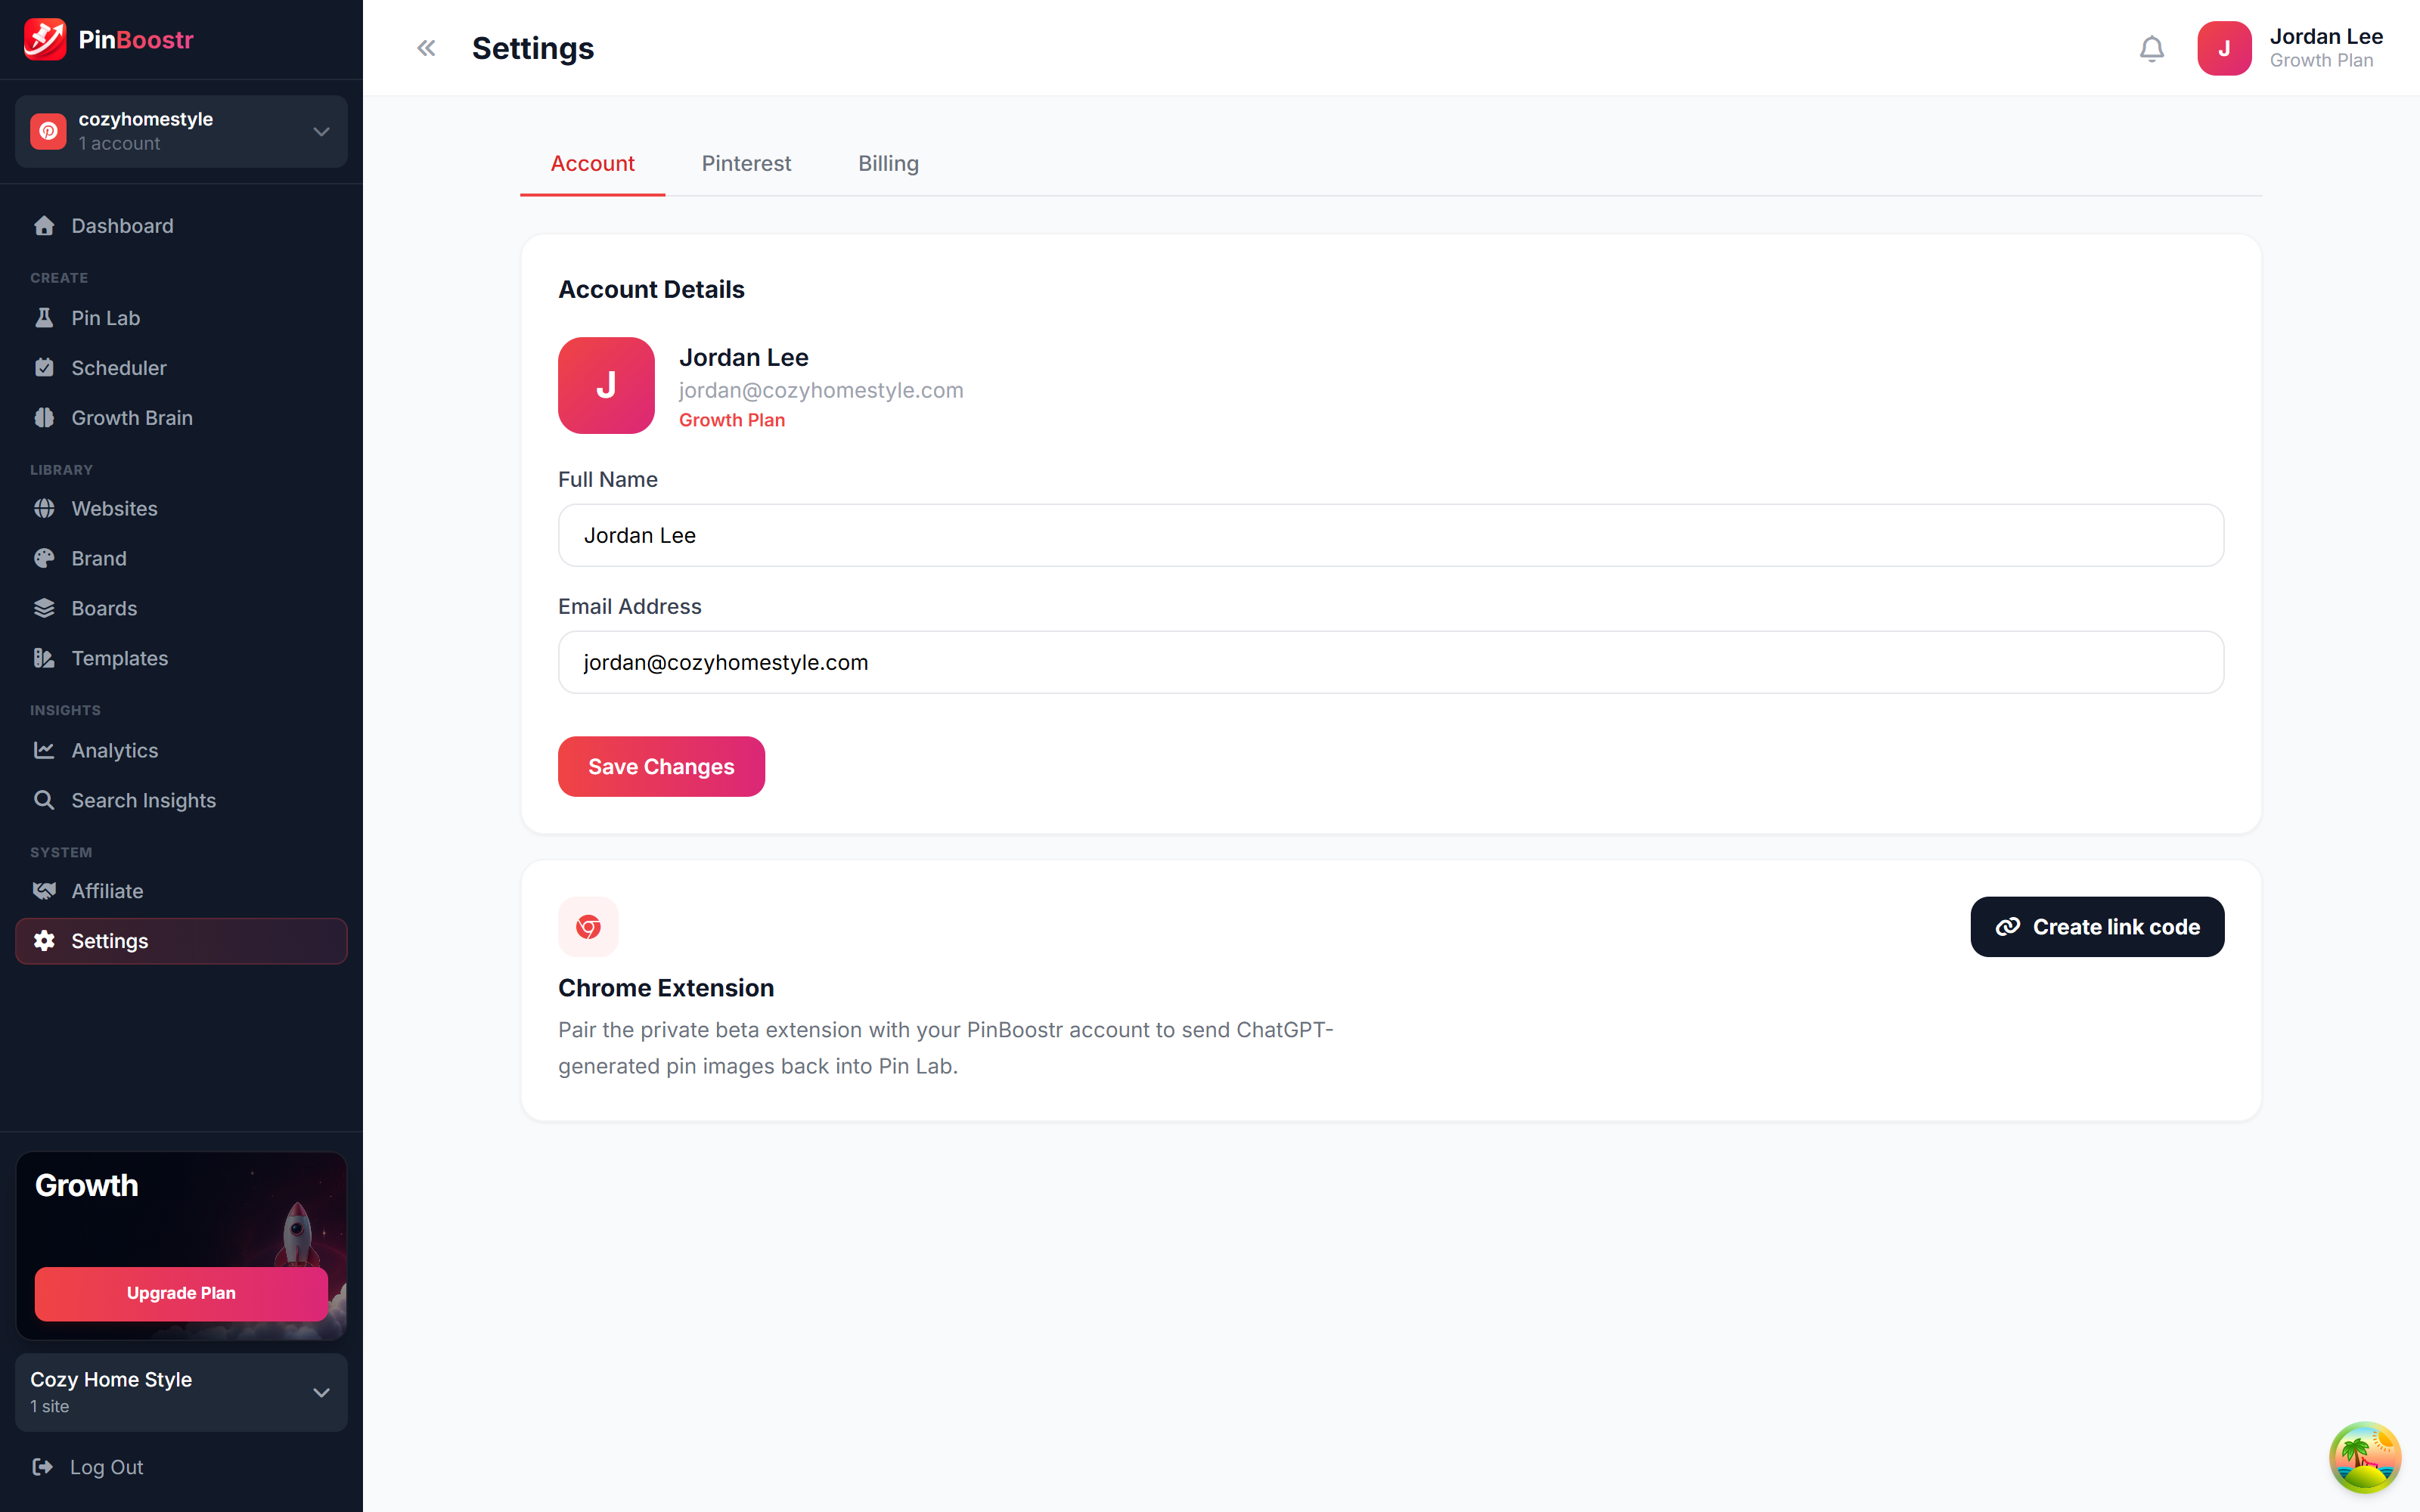
Manage account, plan & billing

One place to verify your profile, connected accounts, usage meters, and billing.

pinboostr.com/dashboard
Manage account, plan & billing screenshot
  1. Open Settings → Account to edit your name and email.
  2. Use the Pinterest tab to add, switch, or disconnect accounts.
  3. Open Billing to see your plan and usage meters.
  4. Pair the Chrome extension if you create images elsewhere.
  5. Upgrade when a feature is locked or a limit is reached.
Good to know
  • Usage meters show daily pins, AI pins, AI images, and keyword research left.
  • If a workflow feels blocked, check Settings before rebuilding it.
13 4 min All plans

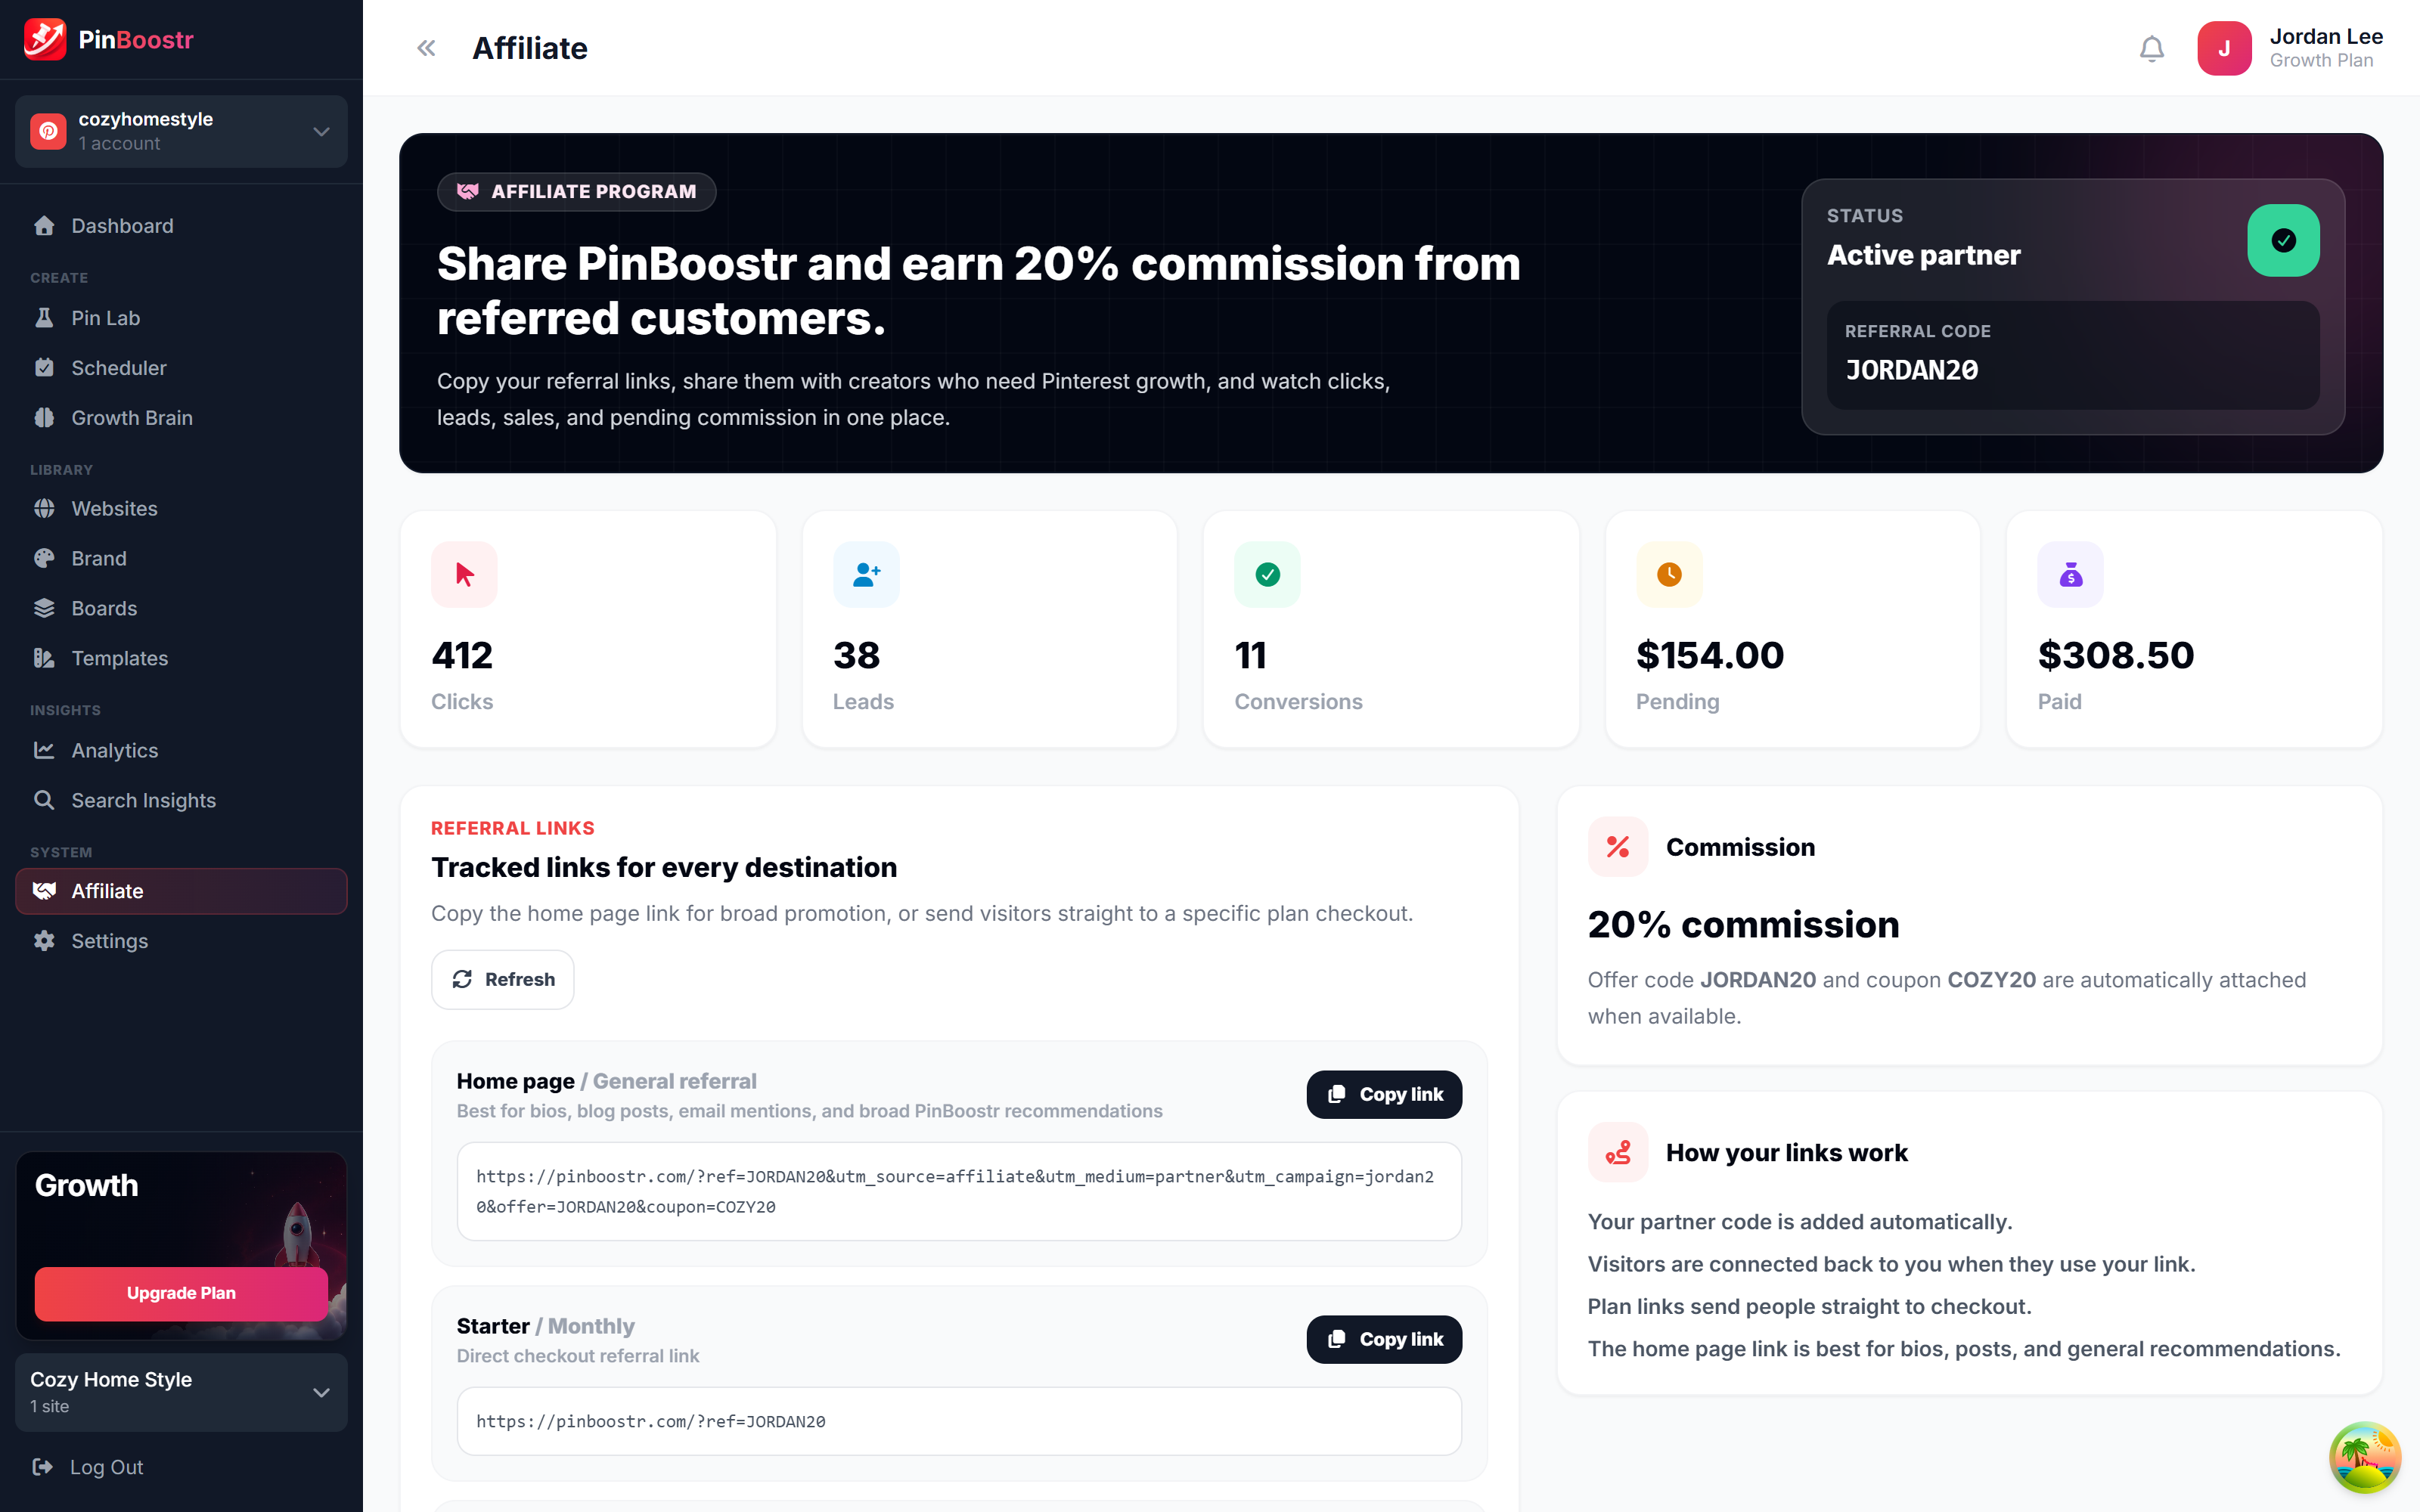
Earn with the affiliate program

Get 20% commission for customers you refer, with clicks, leads, conversions, and payouts tracked in one place.

pinboostr.com/dashboard
Earn with the affiliate program screenshot
  1. Open Affiliate to see your status and referral code.
  2. Copy a referral link — home page or a specific plan checkout.
  3. Share it with creators, bloggers, and brands.
  4. Watch clicks, leads, and conversions update live.
  5. Track pending and paid commission as referrals convert.
Good to know
  • Your coupon and offer code attach automatically to links.
  • Add your link to your bio and posts for steady passive earnings.

Stuck? Quick fixes

The most common questions, with a one-line answer each.

Pinterest will not connect

Sign in to the correct Pinterest account in the same browser, then reconnect from Settings.

A board is missing

Click Sync Boards and confirm the active Pinterest account can access that board.

A Pin Lab row is not ready

Open the row editor and fix every “Required” item before approving.

AI images are blocked

Finish your Brand / AI Designer style for the selected website, then generate again.

A scheduled pin failed

Open the pin, read the error, fix the cause, then retry or reschedule.

A feature is locked

Check your plan in Settings → Billing and upgrade if it needs a higher tier.

Ready? Create your first pin

The best way to learn is to make one small reviewed batch. It builds confidence in your account, boards, designs, and schedule.